Showing posts with label System Information. Show all posts

Wednesday, 12 October 2016

Configure IP Address and DNS from Command Line

The IP address of your computer can be set from the command prompt by running the following commands at an administrative level prompt:

netsh interface ip set address name="Local Area Connection" static 123.123.123.123 255.255.255.0 123.123.123.1 1
Local Area Connection is the name of the adapter you want to modify. In single NIC systems it is normally called Local Area Connection.
123.123.123.123 is the IP address you want to set. 
255.255.255.0 is the subnet mask. 
123.123.123.1 is the gateway.
1 is the gateway metric. You can leave this as 1 for almost all cases.  
If you want to enable DHCP you can run:
netsh interface ip set address name="Local Area Connection" dhcp
There are two commands for DNS since administrators typically configure a primary and secondary DNS server. 
For the primary DNS run:
netsh interface ip set dns name="Local Area Connection" static 208.67.222.222
For the secondary run:
netsh interface ip add dns name="Local Area Connection" 208.67.220.220 index=2
If you want to configure the computer to use DNS from DHCP run:
netsh interface ip set dnsservers name="Local Area Connection" source=dhcp
When you are finished with all of your IP and DNS changes run ipconfig -all to review the new settings.

Monday, 13 October 2014

What is RAID ?

RAID is a Redundant Array of Inexpensive disks, but nowadays it is called Redundant Array of Independent drives. Earlier it is used to be very costly to buy even a smaller size of disk, but nowadays we can buy a large size of disk with the same amount like before. Raid is just a collection of disks in a pool to become a logical volume.
RAID in Linux
Understanding RAID Setups in Linux
Raid contains groups or sets or Arrays. A combine of drivers make a group of disks to form a RAID Array or RAID set. It can be a minimum of 2 number of disk connected to a raid controller and make a logical volume or more drives can be in a group. Only one Raid level can be applied in a group of disks. Raid are used when we need excellent performance. According to our selected raid level, performance will differ. Saving our data by fault tolerance & high availability.
This series will be titled Preparation for the setting up RAID ‘s through Parts 1-9 and covers the following topics.
Part 1Introduction to RAID, Concepts of RAID and RAID Levels
Part 2: How to setup RAID0 (Stripe) in Linux
Part 3: How to setup RAID1 (Mirror) in Linux
Part 4: How to setup RAID5 (Striping with Distributed Parity) in Linux
Part 5: How to setup RAID6 (Striping with Double Distributed Parity) in Linux
Part 6: How to setup RAID10 or 1+0 (Nested) in Linux
Part 7: Grow a RAID Array in Linux
Part 8: Recovering (Rebuilding) failed drives in RAID
Part 9: Managing RAID in Linux
This is the Part 1 of a 9-tutorial series, here we will cover the introduction of RAID, Concepts of RAID and RAID Levels that are required for the setting up RAID in Linux.

Software RAID and Hardware RAID

Software RAID have low performance, because of consuming resource from hosts. Raid software need to load for read data from software raid volumes. Before loading raid software, OS need to get boot to load the raid software. No need of Physical hardware in software raids. Zero cost investment.
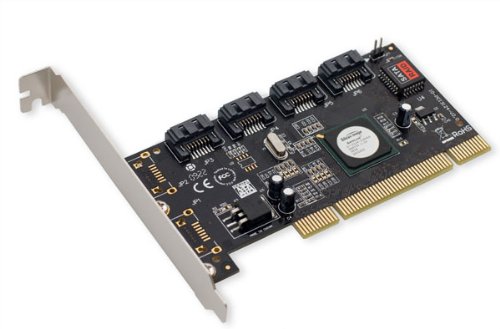
Hardware RAID have high performance. They are dedicated RAID Controller which is Physically built using PCI express cards. It won’t use the host resource. They have NVRAM for cache to read and write. Stores cache while rebuild even if there is power-failure, it will store the cache using battery power backups. Very costly investments needed for a large scale.
Hardware RAID Card will look like below:
Hardware RAID
Hardware RAID

Featured Concepts of RAID

  1. Parity method in raid regenerate the lost content from parity saved information’s. RAID 5, RAID 6 Based on Parity.
  2. Stripe is sharing data randomly to multiple disk. This won’t have full data in a single disk. If we use 3 disks half of our data will be in each disks.
  3. Mirroring is used in RAID 1 and RAID 10. Mirroring is making a copy of same data. In RAID 1 it will save the same content to the other disk too.
  4. Hot spare is just a spare drive in our server which can automatically replace the failed drives. If any one of the drive failed in our array this hot spare drive will be used and rebuild automatically.
  5. Chunks are just a size of data which can be minimum from 4KB and more. By defining chunk size we can increase the I/O performance.
RAID’s are in various Levels. Here we will see only the RAID Levels which is used mostly in real environment.
  1. RAID0 = Striping
  2. RAID1 = Mirroring
  3. RAID5 = Single Disk Distributed Parity
  4. RAID6 = Double Disk Distributed Parity
  5. RAID10 = Combine of Mirror & Stripe. (Nested RAID)
RAID are managed using mdadm package in most of the Linux distributions. Let us get a Brief look into each RAID Levels.

RAID 0 (or) Striping

Striping have a excellent performance. In Raid 0 (Striping) the data will be written to disk using shared method. Half of the content will be in one disk and another half will be written to other disk.
Let us assume we have 2 Disk drives, for example, if we write data “TECMINT” to logical volume it will be saved as ‘T‘ will be saved in first disk and ‘E‘ will be saved in Second disk and ‘C‘ will be saved in First disk and again ‘M‘ will be saved in Second disk and it continues in round-robin process.
In this situation if any one of the drive fails we will loose our data, because with half of data from one of the disk can’t use to rebuilt the raid. But while comparing to Write Speed and performance RAID 0 is Excellent. We need at least minimum 2 disks to create a RAID 0 (Striping). If you need your valuable data don’t use this RAID LEVEL.
  1. High Performance.
  2. There is Zero Capacity Loss in RAID 0
  3. Zero Fault Tolerance.
  4. Write and Reading will be good performance.

RAID 1 (or) Mirroring

Mirroring have a good performance. Mirroring can make a copy of same data what we have. Assuming we have two numbers of 2TB Hard drives, total there we have 4TB, but in mirroring while the drives are behind the RAID Controller to form a Logical drive Only we can see the 2TB of logical drive.
While we save any data, it will write to both 2TB Drives. Minimum two drives are needed to create a RAID 1 or Mirror. If a disk failure occurred we can reproduce the raid set by replacing a new disk. If any one of the disk fails in RAID 1, we can get the data from other one as there was a copy of same content in the other disk. So there is zero data loss.
  1. Good Performance.
  2. Here Half of the Space will be lost in total capacity.
  3. Full Fault Tolerance.
  4. Rebuilt will be faster.
  5. Writing Performance will be slow.
  6. Reading will be good.
  7. Can be used for operating systems and database for small scale.

RAID 5 (or) Distributed Parity

RAID 5 is mostly used in enterprise levels. RAID 5 work by distributed parity method. Parity info will be used to rebuild the data. It rebuilds from the information left on the remaining good drives. This will protect our data from drive failure.
Assume we have 4 drives, if one drive fails and while we replace the failed drive we can rebuild the replaced drive from parity informations. Parity information’s are Stored in all 4 drives, if we have 4 numbers of 1TB hard-drive. The parity information will be stored in 256GB in each drivers and other 768GB in each drives will be defined for Users. RAID 5 can be survive from a single Drive failure, If drives fails more than 1 will cause loss of data’s.
  1. Excellent Performance
  2. Reading will be extremely very good in speed.
  3. Writing will be Average, slow if we won’t use a Hardware RAID Controller.
  4. Rebuild from Parity information from all drives.
  5. Full Fault Tolerance.
  6. 1 Disk Space will be under Parity.
  7. Can be used in file servers, web servers, very important backups.

RAID 6 Two Parity Distributed Disk

RAID 6 is same as RAID 5 with two parity distributed system. Mostly used in a large number of arrays. We need minimum 4 Drives, even if there 2 Drive fails we can rebuild the data while replacing new drives.
Very slower than RAID 5, because it writes data to all 4 drivers at same time. Will be average in speed while we using a Hardware RAID Controller. If we have 6 numbers of 1TB hard-drives 4 drives will be used for data and 2 drives will be used for Parity.
  1. Poor Performance.
  2. Read Performance will be good.
  3. Write Performance will be Poor if we not using a Hardware RAID Controller.
  4. Rebuild from 2 Parity Drives.
  5. Full Fault tolerance.
  6. 2 Disks space will be under Parity.
  7. Can be Used in Large Arrays.
  8. Can be use in backup purpose, video streaming, used in large scale.

RAID 10 (or) Mirror & Stripe

RAID 10 can be called as 1+0 or 0+1. This will do both works of Mirror & Striping. Mirror will be first and stripe will be the second in RAID 10. Stripe will be the first and mirror will be the second in RAID 01. RAID 10 is better comparing to 01.
Assume, we have 4 Number of drives. While I’m writing some data to my logical volume it will be saved under All 4 drives using mirror and stripe methods.
If I’m writing a data “TECMINT” in RAID 10 it will save the data as follow. First “T” will write to both disks and second “E” will write to both disk, this step will be used for all data write. It will make a copy of every data to other disk too.
Same time it will use the RAID 0 method and write data as follow “T” will write to first disk and “E” will write to second disk. Again “C” will write to first Disk and “M” to second disk.
  1. Good read and write performance.
  2. Here Half of the Space will be lost in total capacity.
  3. Fault Tolerance.
  4. Fast rebuild from copying data.
  5. Can be used in Database storage for high performance and availability.

Conclusion

In this article we have seen what is RAID and which levels are mostly used in RAID in real environment. Hope you have learned the write-up about RAID. For RAID setup one must know about the basic Knowledge about RAID. The above content will fulfil basic understanding about RAID.
In the next upcoming articles I’m going to cover how to setup and create a RAID using Various Levels, Growing a RAID Group (Array) and Troubleshooting with failed Drives and much more.

Thursday, 7 August 2014

Windows Run Commands

Accessibility Controls - access.cpl 
Add Hardware Wizard - hdwwiz.cpl 
Add/Remove Programs - appwiz.cpl 
Administrative Tools - control admintools 
Automatic Updates - wuaucpl.cpl 
Bluetooth Transfer Wizard - fsquirt 
Calculator - calc 
Certificate Manager - certmgr.msc 
Character Map - charmap 
Check Disk Utility - chkdsk 
Clipboard Viewer - clipbrd 
Command Prompt - cmd 
Component Services - dcomcnfg 
Computer Management - compmgmt.msc 
Date and Time Properties - timedate.cpl 
DDE Shares - ddeshare 
Device Manager - devmgmt.msc 
Direct X Control Panel (If Installed)* - directx.cpl 
Direct X Troubleshooter - dxdiag 
Disk Cleanup Utility - cleanmgr 
Disk Defragment - dfrg.msc 
Disk Management - diskmgmt.msc 
Disk Partition Manager - diskpart 
Display Properties - control desktop 
Display Properties - desk.cpl 
Display Properties (w/Appearance Tab Preselected) - control color 
Dr. Watson System Troubleshooting Utility - drwtsn32 
Driver Verifier Utility - verifier 
Event Viewer - eventvwr.msc 
File Signature Verification Tool - sigverif 
Findfast - findfast.cpl 
Folders Properties - control folders 
Fonts - control fonts 
Fonts Folder - fonts 
Free Cell Card Game - freecell 
Game Controllers - joy.cpl 
Group Policy Editor (XP Prof) - gpedit.msc 
Hearts Card Game - mshearts 
Iexpress Wizard - iexpress 
Indexing Service - ciadv.msc 
Internet Properties - inetcpl.cpl 
IP Configuration (Display Connection Configuration) - ipconfig /all 
IP Configuration (Display DNS Cache Contents) - ipconfig /displaydns 
IP Configuration (Delete DNS Cache Contents) - ipconfig /flushdns 
IP Configuration (Release All Connections) - ipconfig /release 
IP Configuration (Renew All Connections) - ipconfig /renew 
IP Configuration (Refreshes DHCP & Re-Registers DNS) - ipconfig /registerdns 
IP Configuration (Display DHCP Class ID) - ipconfig /showclassid 
IP Configuration (Modifies DHCP Class ID) - ipconfig /setclassid 
Java Control Panel (If Installed) - jpicpl32.cpl 
Java Control Panel (If Installed) - javaws 
Keyboard Properties - control keyboard 
Local Security Settings - secpol.msc 
Local Users and Groups - lusrmgr.msc 
Logs You Out Of Windows - logoff 
Microsoft Chat - winchat 
Minesweeper Game - winmine 
Mouse Properties - control mouse 
Mouse Properties - main.cpl 
Network Connections - control netconnections 
Network Connections - ncpa.cpl 
Network Setup Wizard - netsetup.cpl 
Notepad - notepad 
Nview Desktop Manager (If Installed) - nvtuicpl.cpl 
Object Packager - packager 
ODBC Data Source Administrator - odbccp32.cpl 
On Screen Keyboard - osk 
Opens AC3 Filter (If Installed) - ac3filter.cpl 
Password Properties - password.cpl 
Performance Monitor - perfmon.msc 
Performance Monitor - perfmon 
Phone and Modem Options - telephon.cpl 
Power Configuration - powercfg.cpl 
Printers and Faxes - control printers 
Printers Folder - printers 
Private Character Editor - eudcedit 
Quicktime (If Installed) - QuickTime.cpl 
Regional Settings - intl.cpl 
Registry Editor - regedit 
Registry Editor - regedit32 
Remote Desktop - mstsc 
Removable Storage - ntmsmgr.msc 
Removable Storage Operator Requests - ntmsoprq.msc 
Resultant Set of Policy (XP Prof) - rsop.msc 
Scanners and Cameras - sticpl.cpl 
Scheduled Tasks - control schedtasks 
Security Center - wscui.cpl 
Services - services.msc 
Shared Folders - fsmgmt.msc 
Shuts Down Windows - shutdown 
Sounds and Audio - mmsys.cpl 
Spider Solitare Card Game - spider 
SQL Client Configuration - cliconfg 
System Configuration Editor - sysedit 
System Configuration Utility - msconfig 
System File Checker Utility (Scan Immediately) - sfc /scannow 
System File Checker Utility (Scan Once At Next Boot) - sfc /scanonce 
System File Checker Utility (Scan On Every Boot) - sfc /scanboot 
System File Checker Utility (Return to Default Setting) - sfc /revert 
System File Checker Utility (Purge File Cache) - sfc /purgecache 
System File Checker Utility (Set Cache Size to size x) - sfc /cachesize=x 
System Properties - sysdm.cpl 
Task Manager - taskmgr 
Telnet Client - telnet 
User Account Management - nusrmgr.cpl 
Utility Manager - utilman 
Windows Firewall - firewall.cpl 
Windows Magnifier - magnify 
Windows Management Infrastructure - wmimgmt.msc 
Windows System Security Tool - syskey 
Windows Update Launches - wupdmgr 
Windows XP Tour Wizard - tourstart 
Wordpad - write 

Tuesday, 15 July 2014

Step By Step Guide for Windows Server 2008 Domain Controller and DNS Server Setup

This tutorial will explain how to setup Windows Server 2008 Domain Controller and DNS
Server.
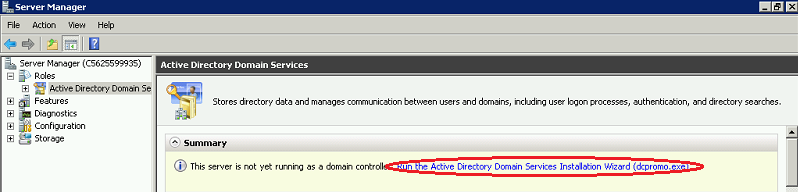
Click on Start > Run

Now type dcpromo > Click OK

The system will start checking if Active Directory Domain Services ( AD DS) binaries are installed, then will start installing them. The binaries could be installed if you had run the dcpromo command previously and then canceled the operation after the binaries were installed.


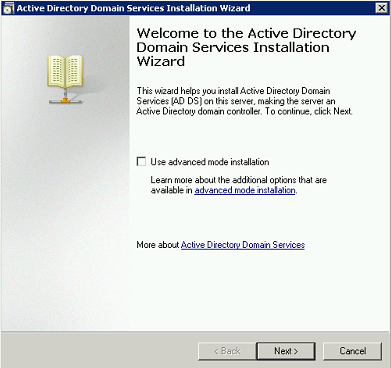
The Active Directory Domain Services Installation Wizard will start, either enable the checkbox beside Use Advanced mode installation and Click Next , or keep it unselected and click on Next

The Operating System Compatibility page will be displayed, take a moment to read it and click Next

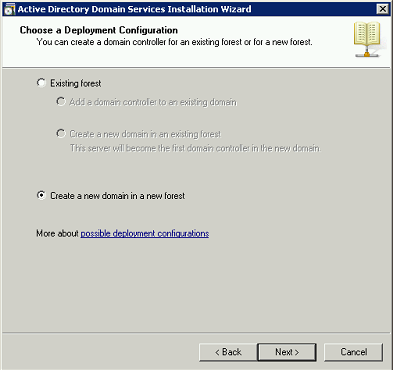
Choose Create a new domain in a new forest, Click Next

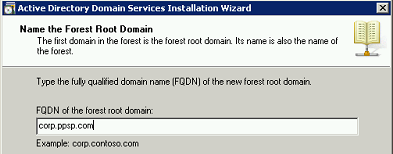
Enter the Fully Qualified Domain Name of the forest root domain inside the textbox, click Next

If you selected Use advanced mode installation on the Welcome page, the Domain NetBIOS Name page appears. On this page, type the NetBIOS name of the domain if necessary or accept the default name and then click Next.

Select the Forest Functional Level, choose the level you desire and click on Next.

Make sure to read the description of each functional level to understand the difference between each one.
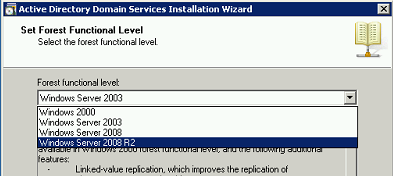
In the previous step, If you have selected any Forest Functional Level other than windows Server 2008 and clicked on Next , you would then get a page to select the domain Functional Level. Select it and then click on Next
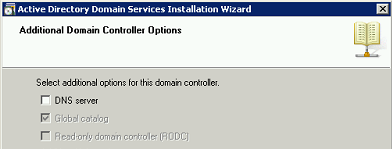
In the Additional Domain Controller Options page, you can select to install the domain Name Service to your server. Note that the First domain controller in a forest must be a Global Catalog that’s why the checkbox beside Global Catalog is selected and it cannot be cleared. The checkbox is also selected by default when you install an additional domain controller in an existing domain, however you can clear this checkbox if you do not want the additional domain controller to be a global catalog server. The first domain controller in a new forest or in a new domain can not be a Read Only Domain Controller (RODC), you can later add a RODC but you must have at least one Windows Server 2008 Domain Controller.
I want to set my DC as a DNS Server as well, so I will keep the checkbox beside DNS server selected and click on Next

If you don’t have static ip assigned to your server you will see similar to the following screen now you need to assign static ip and start the above process.

If the wizard cannot create a delegation for the DNS server, it displays a message to indicate that you can create the delegation manually. To continue, click Yes

Now you will have the location where the domain controller database, log files and SYSVOL are stored on the server.
The database stores information about the users, computers and other objects on the network. the log files record activities that are related to AD DS, such information about an object being updated. SYSVOL stores Group Policy objects and scripts. By default, SYSVOL is part of the operating system files in the Windows directory either type or browse to the volume and folder where you want to store each, or accept the defaults and click on Next

In the Directory Services Restore Mode Administrator Password (DSRM) page, write a password and confirm it. This password is used when the domain controller is started in Directory Services Restore Mode, which might be because Active Directory Domain services is not running, or for tasks that must be performed offline.Make sure that you memorize this password when you need it.

Summary page will be displayed showing you all the setting that you have set . It gives you the option to export the setting you have setup into an answer file for use with other unattended operations, if you wish to have such file, click on the Export settings button and save the file.

DNS Installation will start

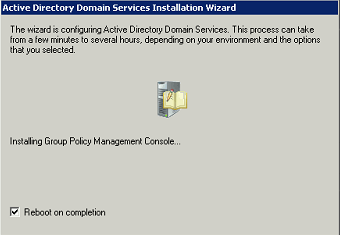
Followed by installing Group Policy Management Console, the system will check first if it is installed or not.


Configuring the local computer to host active directory Domain Services and other operations will take place setting up this server as a Domain Controller active Directory Domain Services installation will be completed, click Finish.

Click on Restart Now to restart your server for the changes to take effect.

Once the server is booted and you logon to it, click on Start > Administrative Tools
you will notice that following have been installed :
Active Directory Domains and Trusts
Active Directory Sites and Services
Active Directory Users and Computers
ADSI Edit
DNS
Group Policy Management

That’s it now your new win server 2008 domain controller with dns server setup was completed.

How to setup and configure a Domain Controller on Windows Server 2008 R2

In this series of articles I will be explaining the most simple and efficient ways to perform common tasks in Windows Server and SharePoint Server environments. Here I will focus on Active Directory Domain Services setup and configuration of a new Domain Controller. 

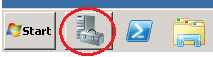
1. Log into your Windows Server and start the Server manager
 1.png
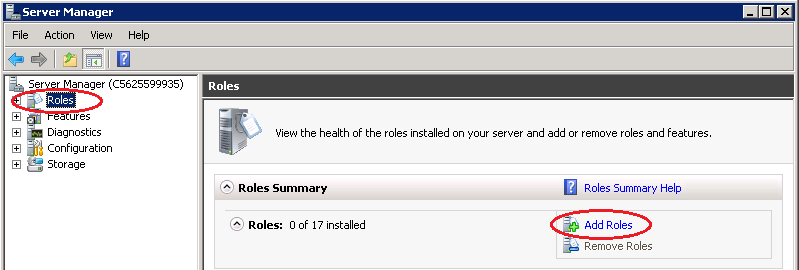
2. Navigate to the Server Roles tab and press on the Add Rolesbutton.
2.png
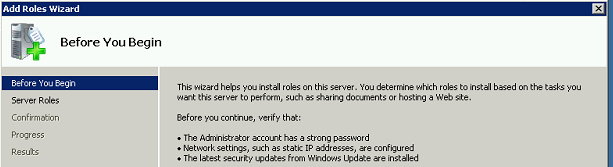
3. The Add Roles Wizard is going to open up, click Next.
3.png
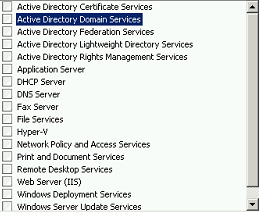
4. The Wizard will display a list of Roles. Choose the Active Directory Domain Services Role.
4.png
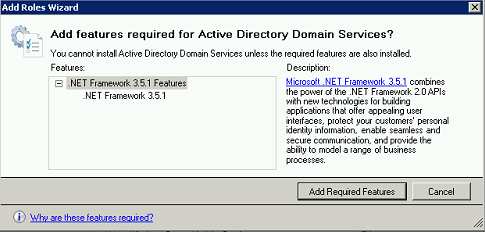
5. The Active Directory Domain Services Role requires adding features to the server. Click on “Add required features” on the appearing screen and then click on next.
5.png
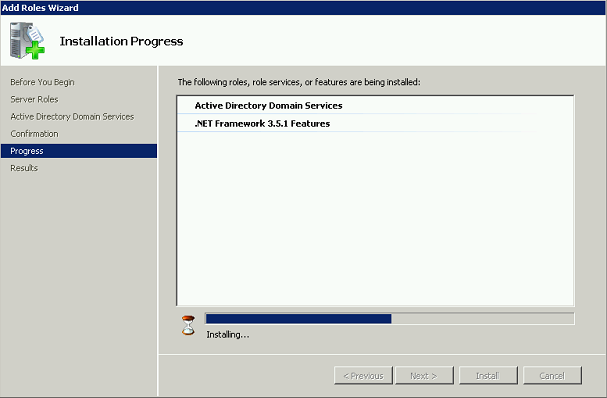
6. On the following screen click on Install and wait for the installation to finish. When the installation finishes click on Close.
6.png
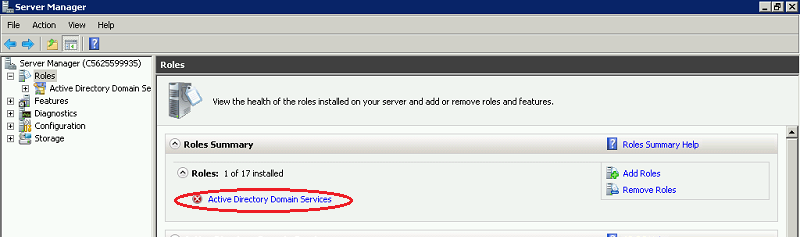
7. At this point the Active Directory Domain Services are not configured yet.
7.png
8. If we click on Active Directory Domain Services button we get to the following screen. Our next step will be configuring Active Directory Domain Services using dcpromo.exe.
8.png
9. We are about to start the Active Directory Domain Services installation Wizard.
9.png
10. Navigate to the following screen. Choose the “Create a new domain in a new forest option” and click on next button.
10.png
11. Type in your Domain name.
11.png
12. Choose the oldest operating system in your network. This option exists for backwards compatibility of different features.
12.png
13. If your Domain Controller is a stand-alone server you don’t have to choose the DNS server option. If otherwise, it’s recommended to leave it checked.
13.png
14. Specify the folders that will contain the Active Directory controller database, log files. And SYSVOL and click on Next.
15. Choose a password for Restore mode Administrator account. (This is not the Domain Administrator account, this is an additional account used for recovery)
16. When the wizard finishes configuring the settings reboot your server.
16.png
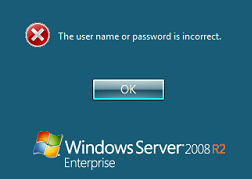
17. After rebooting when you first log on the server is not going to accept your machine Administrator account.
17.png
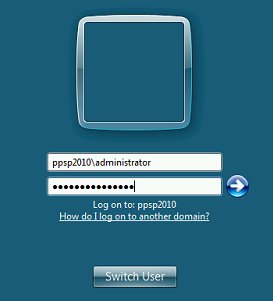
18. In order to solve this issue you need to choose the “Switch User” button and login with your Domain Administrator account which is basically the same user account and password but now it belongs to a domain the domain name is needed. For example: PPSP2010\Administrator.
end.png

Install and configure a DNS server in Windows Server 2008

Installation

You can install a DNS server from the Control Panel or when promoting a member server to a domain controller (DC) (Figure A). During the promotion, if a DNS server is not found, you will have the option of installing it.

Figure A

Domain controller
To install a DNS server from the Control Panel, follow these steps:
  • From the Start menu, select | Control Panel | Administrative Tools | Server Manager.
  • Expand and click Roles (Figure B).
  • Choose Add Roles and follow the wizard by selecting the DNS role (Figure C).
  • Click Install to install DNS in Windows Server 2008 (Figure D).

Figure B

Expand and click Roles

Figure C

DNS role

Figure D

Install DNS

DNS console and configuration

After installing DNS, you can find the DNS console from Start | All Programs | Administrative Tools | DNS. Windows 2008 provides a wizard to help configure DNS.
When configuring your DNS server, you must be familiar with the following concepts:
  • Forward lookup zone
  • Reverse lookup zone
  • Zone types
A forward lookup zone is simply a way to resolve host names to IP addresses. A reverse lookup zone allows a DNS server to discover the DNS name of the host. Basically, it is the exact opposite of a forward lookup zone. A reverse lookup zone is not required, but it is easy to configure and will allow for your Windows Server 2008 Server to have full DNS functionality.
When selecting a DNS zone type, you have the following options: Active Directory (AD) Integrated, Standard Primary, and Standard Secondary. AD Integrated stores the database information in AD and allows for secure updates to the database file. This option will appear only if AD is configured. If it is configured and you select this option, AD will store and replicate your zone files.
A Standard Primary zone stores the database in a text file. This text file can be shared with other DNS servers that store their information in a text file. Finally, a Standard Secondary zone simply creates a copy of the existing database from another DNS server. This is primarily used for load balancing.
To open the DNS server configuration tool:
  1. Select DNS from the Administrative Tools folder to open the DNS console.
  2. Highlight your computer name and choose Action | Configure a DNS Server... to launch the Configure DNS Server Wizard.
  3. Click Next and choose to configure the following: forward lookup zone, forward and reverse lookup zone, root hints only (Figure E).
  4. Click Next and then click Yes to create a forward lookup zone (Figure F).
  5. Select the appropriate radio button to install the desired Zone Type (Figure G).
  6. Click Next and type the name of the zone you are creating.
  7. Click Next and then click Yes to create a reverse lookup zone.
  8. Repeat Step 5.
  9. Choose whether you want an IPv4 or IPv6 Reverse Lookup Zone (Figure H).
  10. Click Next and enter the information to identify the reverse lookup zone (Figure I).
  11. You can choose to create a new file or use an existing DNS file (Figure J).
  12. On the Dynamic Update window, specify how DNS accepts secure, nonsecure, or no dynamic updates.
  13. If you need to apply a DNS forwarder, you can apply it on the Forwarders window. (Figure K).
  14. Click Finish (Figure L).

Figure E

Configure

Figure F

Forward lookup zone

Figure G

Desired zone

Figure H


IPv4 or IPv6

Figure I

Reverse lookup zone

Figure J

Choose new or existing DNS file

Figure K

Forwarders window

Figure L

Finish

Managing DNS records

You have now installed and configured your first DNS server, and you're ready to add records to the zone(s) you created. There are various types of DNS records available. Many of them you will never use. We'll be looking at these commonly used DNS records:
  • Start of Authority (SOA)
  • Name Servers
  • Host (A)
  • Pointer (PTR)
  • Canonical Name (CNAME) or Alias
  • Mail Exchange (MX)

Start of Authority (SOA) record

The Start of Authority (SOA) resource record is always first in any standard zone. The Start of Authority (SOA) tab allows you to make any adjustments necessary. You can change the primary server that holds the SOA record, and you can change the person responsible for managing the SOA. Finally, one of the most important features of Windows 2000 is that you can change your DNS server configuration without deleting your zones and having to re-create the wheel (Figure M).

Figure M

Change configuration

Name Servers

Name Servers specify all name servers for a particular domain. You set up all primary and secondary name servers through this record.
To create a Name Server, follow these steps:
  1. Select DNS from the Administrative Tools folder to open the DNS console.
  2. Expand the Forward Lookup Zone.
  3. Right-click on the appropriate domain and choose Properties (Figure N).
  4. Select the Name Servers tab and click Add.
  5. Enter the appropriate FQDN Server name and IP address of the DNS server you want to add.

Figure N

Name Server

Host (A) records

A Host (A) record maps a host name to an IP address. These records help you easily identify another server in a forward lookup zone. Host records improve query performance in multiple-zone environments, and you can also create a Pointer (PTR) record at the same time. A PTR record resolves an IP address to a host name.
To create a Host record:
  1. Select DNS from the Administrative Tools folder to open the DNS console.
  2. Expand the Forward Lookup Zone and click on the folder representing your domain.
  3. From the Action menu, select New Host.
  4. Enter the Name and IP Address of the host you are creating (Figure O).
  5. Select the Create Associated Pointer (PTR) Record check box if you want to create the PTR record at the same time. Otherwise, you can create it later.
  6. Click the Add Host button.

Figure O

A Host (A) record

Pointer (PTR) records

A Pointer (PTR) record creates the appropriate entry in the reverse lookup zone for reverse queries. As you saw in Figure H, you have the option of creating a PTR record when creating a Host record. If you did not choose to create your PTR record at that time, you can do it at any point.
To create a PTR record:
  1. Select DNS from the Administrative Tools folder to open the DNS console.
  2. Choose the reverse lookup zone where you want your PTR record created.
  3. From the Action menu, select New Pointer (Figure P).
  4. Enter the Host IP Number and Host Name.
  5. Click OK.

Figure P

New Pointer

Canonical Name (CNAME) or Alias records

A Canonical Name (CNAME) or Alias record allows a DNS server to have multiple names for a single host. For example, an Alias record can have several records that point to a single server in your environment. This is a common approach if you have both your Web server and your mail server running on the same machine.
To create a DNS Alias:
  1. Select DNS from the Administrative Tools folder to open the DNS console.
  2. Expand the Forward Lookup Zone and highlight the folder representing your domain.
  3. From the Action menu, select New Alias.
  4. Enter your Alias Name (Figure Q).
  5. Enter the fully qualified domain name (FQDN).
  6. Click OK.

Figure Q


Alias Name

Mail Exchange (MX) records

Mail Exchange records help you identify mail servers within a zone in your DNS database. With this feature, you can prioritize which mail servers will receive the highest priority. Creating MX records will help you keep track of the location of all of your mail servers.
To create a Mail Exchange (MX) record:
  1. Select DNS from the Administrative Tools folder to open the DNS console.
  2. Expand the Forward Lookup Zone and highlight the folder representing your domain.
  3. From the Action menu, select New Mail Exchanger.
  4. Enter the Host Or Domain (Figure R).
  5. Enter the Mail Server and Mail Server Priority.
  6. Click OK.

Figure R

Host or Domain

Other new records

You can create many other types of records. For a complete description, choose Action | Other New Records from the DNS console (Figure S). Select the record of your choice and view the description.

Figure S

Create records from the DNS console

Troubleshooting DNS servers

When troubleshooting DNS servers, the nslookup utility will become your best friend. This utility is easy to use and very versatile. It's a command-line utility that is included within Windows 2008. With nslookup, you can perform query testing of your DNS servers. This information is useful in troubleshooting name resolution problems and debugging other server-related problems. You can access nslookup (Figure T) right from the DNS console.

Figure T

Nslookup utility

VMware Cloud Learning Video's

Here is a nice summary list of all VMworld US 2018 Breakout session with the respective video playback & download URLs. Enjoy! Bra...