Wednesday, 4 September 2013

Applications to the Desktop Context Menu

If you want really quick access to launch a frequently used application without putting extra icons on your desktop, you can add that application to the context menu for the desktop with a simple registry hack. Here’s how to do it.

Adding Applications to the Desktop Context Menu

For today’s lesson we’ll show you how to add Notepad to the menu, but you could add any applications you want instead. The first thing you’ll want to do is open up regedit.exe through the Start Menu search or run box, and then browse down to the following key:
HKEY_CLASSES_ROOT\Directory\Background\shell
The screen should look similar to this one if you are in the right place.
Next, you’ll want to create a new key underneath the shell key, the name of which is exactly what is going to show up on the desktop menu. Right-click on the “shell” key, and then choose New \ Key from the menu.
Give the new key the name that you want to show up on the desktop context menu. For this example we’ll be using Notepad.
 Optional: If you want to assign an “Alt” key to this menu entry for quicker access, you can change the (Default) value on the right and put an & character in front of the key you want to use. For instance, if you wanted to be able to just use the N key to launch Notepad once the desktop context menu pops up, you can do this:

 Next you’ll need to create the command key that will actually hold the command used to launch the application. Right-click on the new Notepad key, and then choose New \ Key from the menu.
 Give this key the name “command” in lowercase.
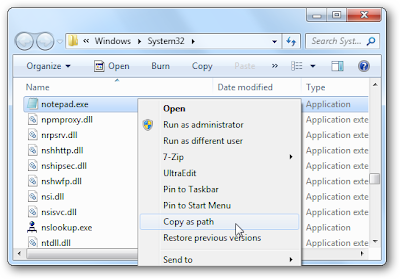
To complete this step you’ll need the full path to the application that you want to launch. You can use Shift + Right-Click to get the Copy as Path menu item to find this more quickly. Note: of course, for Notepad you wouldn’t need the full path, but this is just an example.

 Now click on “command” on the left side, and then double-click on the (Default) key in the right side to edit the string value.

Paste in the full path to the executable that you got from the “Copy as Path” step above, or you can put in the full path yourself if you’d like.
Once it’s done, it should look like this:
 And right-clicking on the desktop will produce the new menu item… naturally, using this menu item should launch Notepad.
 You can add as many applications to the desktop context menu as you’d like, just repeat the steps again with a new menu item name.

How to Deal With Windows XP Black Screen


dealing-with-black-screen-errors-windows-xp
Do you find black screen error on Windows XP? You tried your best but of no vein and ready to change PC. It is time to change your mind, with few steps get rid of this problem. Uninstallation and re-installation of Windows might damage computer. Look for a solution to fix your PC problems instead of just reinstalling system.

People take it as immense disaster in system but do not go in details. If you are regular user, so with few instructions make machine good to work. This usually occurs when your system stops responding, thus results in black screen.
There may be three expected reasons for this problem:
Reason 1: Faulty RAM or Video Card in the Motherboard of the System
Solution: Fix them at proper location and make sure their working. Faulty RAM or Video Card creates problem in startup of Windows and a Black screen error may occur.
Reason 2: If any USB, DVD, or any floppy disk (inserted) in their drives when system starts.
Solution: Remove any DVD, Floppy, or USB stick when u starts system. At times, they halt system to load files and to precede Windows.
Reason 3: Corrupted Master Boot Record
Solution: Follow the procedure:
1.      Insert disc of Windows XP and restart system
2.      Press Enter at welcome setup screen
3.      Press f8 to the license agreement
4.      With option of arrow keys select repair installation by pressing R
5.      Windows XP setup will repair the installation files
6.      System will restart automatically
7.      Then setup program will complete the repair of XP installation.
8.      Now follow the reaming steps for this, you must have Windows product key
9.      Once issue is resolved make it sure system firewall is enabled.
If this procedure does not work properly, you can take some actions in command prompt to get best results. Follow these actions:
1.      Enter administrator password.
2.      You can repair he master boot record using the “fixmbr” command.
3.      In Recovery Console command prompt, type “fixmbr” and press Y to confirm.
4.      Recovery Console is to be installed in Windows.
5.      This will repair the master boot record and will work better.
6.      Moreover, if this command does not help you type “fixboot” and press Y to confirm (in case the primary boot partition is a FAT partition).
7.      Now system will work competently without any error.

Delete Temporary Files in Windows 8

Most of the new systems are available with the pre-installed Windows 8. However, the functions of this new Operating system are different from the previous versions. Often times, new users find it difficult to operate. Moreover, they look for the commands and easy actions to delete the temporary files.
You must know the process of deleting temporary files is different in Windows 8. Therefore follow the below procedure:
Step 1)
Go to the Desktop (click desktop icon from the Start Screen)
Step 2)
Press Windows key + R (to launch Run box)
Step 3)
Type “%temp%” in the box and Click Ok
Step 4)
A new window will pop up for Temporary files folder
Step 5)
Select all files and hit Delete key from your Keyboard
Step 6)
After this, a new dialog box will pop up to confirm the process. Check “Do this for all Current items.”
Click OK to Continue
If you find any error, click “Skip,” close all applications, and repeat the process.

OS X Mavericks

Erick Eckel gives you just the facts on the soon-to-be-released next version of Apple's OS X.
mavericks_OSX.png
This fact sheet will be continually updated with the latest details as we learn more about Apple OS X Mavericks. You can check back and refresh this article to get the latest updates.

What we know

  • Availability:  Fall 2013, likely mid September
  • Base Price: Approximately $20 to $30
  • Distribution: On new systems and via Apple App Store
  • iBooks: Apple will add iBooks integration within OS X, meaning users can synchronize books, bookmarks and notations across multiple compatible devices via iCloud.
  • Maps: Integrated within the OS (as well as the Mail, Contacts and Calendar apps), Maps delivers crisp, detailed views of map locations and destinations while adding additional relevant information (driving directions, telephone numbers, photos, etc.) to assist travelers or the curious. A Flyover view, meanwhile, adds interactive 3D viewing for locations. Maps and destinations researched on the laptop or desktop can be transferred to an iPhone for navigation assistance.
  • Calendar: Boasting a streamlined new interface, the new Calendar faeatures continuous scrolling, making it easier to navigate week and month views. A new event Inspector assists users in create appointments, edit events, identify popular meeting locations, add mapped destinations and more. The new Calendar also calculates travel time and displays helpful weather information for meeting destinations.
  • Safari: Apple’s trusty Web browser features speed improvements (thanks to Nitro Tiered JIT and Fast Start technologies) making it faster than Firefox and Chrome, lowers battery consumption and adds a Shared Links sidebar that displays links from social media contacts as part of a refreshed design. The browser also benefits from improved memory usage.
  • iCloud Keychain: iCloud Keychain helps users better manage passwords, an increasing problem as digerati become increasingly dependent upon Web sites and cloud services for everyday tasks and operations. The iCloud Keychain integrates and collects password storage, credit card information and similar sensitive data within a secure, connected cloud. The technology is designed to work across multiple devices, including OS X systems, iPads and iPhones.
  • Multiple Display Refinements: Dual displays used to be a luxury. No more. Businesses have discovered the productivity and efficiency benefits that result when using multiple monitors. Mavericks introduces improved multiple display support and eliminates primary and secondary display configurations. Instead, Mavericks adds Dock flexibility, includes a menu bar on each display and adds support for AirPlay-connected monitors, among other new capabilities.
  • Notifications: Email, news, Tweet and other updates, popularized on iPads and iPhones, comes to OS X with the Mavericks release. Notifications alert users to updates, messages, email, breaking news and other information, including FaceTime video calls.
  • Finder Tabs: With Mavericks, users can maintain separate tabs for documents, network files and more. Being able to track multiple locations leveraging separate tabs within the OS X Finder eliminates the need to open multiple Finder windows and simplifies desktop interaction.
  • Tags: Tags, the indexing technology that really took off as Web 2.0 projects grew in popularity, provide a simple way to organize, search and locate files containing relevant information. Built within Mavericks, tags enable indexing files across multiple locations, including spreadsheets, documents and presentations stored on different Apple devices connected by iCloud.
  • Developer Tools: New APIs assist developers in producing more efficient software programs and applications. A new Sprite Kit makes it easier to produce two-dimensional interfaces, while a new AV Kit simplifies support for modern media formats and assists transitioning QuickTime-based apps to alternative media formats.
  • Timer Coalescing: By better grouping operations and better leveraging idle CPU cycles, Mavericks’ Timer Coalescing technology can reduce CPU activity and prolong battery life.
  • App Nap: Mavericks’ App Nap assists OS X in saving power, lowering CPU usage and conserving battery life by making intelligent decisions and reducing power dedicated to an app that is open but isn’t being actively used or is covered by other active application windows.
  • Compressed Memory: Mavericks systems that approach maximum memory use benefit from new Compressed Memory technology in which the OS automatically compresses data from inactive applications. Reducing the RAM dedicated to inactive applications enables Mavericks to dedicate additional memory to active applications requiring additional resources.

God Mode in Windows 7

What is Windows 7 God Mode?

Windows 7 god mode is a simple way to centralized access all the administrative options that are normally seen inside control panel into a newly created folder which can be placed anywhere inside the computer. Usually the  administrative options are seen scattered inside the control panel arranged in different categories and sub categories. windows 7 god mode arrange all the administrative options inside one single window. I find it much more neatly arranged and user friendly. It’s been a long time since I opened my control panel, ever since I started using this god mode.
Surprisingly, the procedure for enabling god mode is very simple. This hidden mode can be enabled in Vista, windows 7 and Windows 8.

How to enable Windows 7 god mode? (can be done in Vista and Win 8)

1) Create a new folder anywhere you like
create new folder What is Windows 7 God Mode?

2) Rename the folder to God Mode.{ED7BA470-8E54-465E-825C-99712043E01C}. The name “God Mode” can be replaced by a name of your choice, but the remaining should be the same.
folder rename god mode What is Windows 7 God Mode?
3) The default folder icon now changes to a Windows 7 god mode control panel icon.
god mode with control panel icon What is Windows 7 God Mode?
4) Once you open the new created control panel icon, you can see all the administrative options arranged inside. There are almost 230 options inside mine.
I find placing this god mode icon in my desktop very helpful. Whenever I need to open options like network and sharing,printers etc, it makes it very easy to find all this icons placed inside one icon rather than going for the control panel.

Windows 7 god mode errors


A word of caution before you use the God mode. Some users have complained that god mode crashed their computer when they tried to enable it on 64 bit Vista operating system. Microsoft couldn’t recreate the same issue on their computer. So it is still not clear, if that was an issue with the Operating system or some software conflicting with the operating system when god mode is enabled. From my end, I have tried the same on couple of computers on training lab with 64 bit Vista ultimate installed, and it worked fine.
Just like Windows 7 god mode revealed here, Microsoft confirmed that the god mode existed for most operating systems which were released before Vista. More and more god modes are discovered and released publicly by bloggers and web enthusiasts.I will come with more of that information in a later post.
If you like this post on Windows 7 god mode, please add a comment or share it with your friends on social media.

How to insert sample text into a document in Word

To insert sample text in Word 2007 or Word 2010, use one of the following methods.

Method 1: Use rand()

To insert localized sample text in Word 2007 or Word 2010, type =rand() in the document where you want the text to appear, and then press ENTER.

The sample text that is inserted for the English version of Word 2007 or Word 2010 resembles the following text:
On the Insert tab, the galleries include items that are designed to coordinate with the overall look of your document. You can use these galleries to insert tables, headers, footers, lists, cover pages, and other document building blocks. When you create pictures, charts, or diagrams, they also coordinate with your current document look.

You can easily change the formatting of selected text in the document text by choosing a look for the selected text from the Quick Styles gallery on the Home tab. You can also format text directly by using the other controls on the Home tab. Most controls offer a choice of using the look from the current theme or using a format that you specify directly.

To change the overall look of your document, choose new Theme elements on the Page Layout tab. To change the looks available in the Quick Style gallery, use the Change Current Quick Style Set command. Both the Themes gallery and the Quick Styles gallery provide reset commands so that you can always restore the look of your document to the original contained in your current template.
Note This text includes a paragraph symbol (¶) that is displayed when sample text is inserted.

You can control how many paragraphs and lines appear by adding numbers inside the parentheses of the rand() function. The =rand() function has the following syntax:
=rand(p,l)

Note In this function, p is the number of paragraphs, and l is the number of lines that you want to appear in each paragraph.
The following are some examples that show how the parameters work:
  • =rand(1) inserts one paragraph with three lines of text in the paragraph.
  • =rand(10,10) inserts 10 paragraphs with 10 lines of text in each paragraph.
The parameters are optional. If you omit the parameters, the default number of paragraphs is three, and the default number of lines per paragraph is also three.

Method 2: Use rand.old()

To insert localized sample text that is compatible with Microsoft Office Word 2003 and earlier versions, type =rand.old() in the document where you want the text to appear, and then press ENTER.

The sample text that is inserted in the English version of Word 2007 or Word 2010 appears resembles the following :
The quick brown fox jumps over the lazy dog. The quick brown fox jumps over the lazy dog. The quick brown fox jumps over the lazy dog. 

The quick brown fox jumps over the lazy dog. The quick brown fox jumps over the lazy dog. The quick brown fox jumps over the lazy dog. 

The quick brown fox jumps over the lazy dog. The quick brown fox jumps over the lazy dog. The quick brown fox jumps over the lazy dog. 
Notice that the sample text in other language versions of Word 2007 or Word 2010 does not have the same meaning as the text that is mentioned earlier in this section.

For example, the Japanese version of Word shows text that is similar in translation to the following text:
"Word 2003 is a ground breaking word processor that enabled…"
And the German version of Word provides the following text:
"Franz jagt im komplett verwahrlosten Taxi quer durch Bayern."
You can control how many paragraphs and lines appear by adding numbers inside the parentheses of the rand.old() function. The =rand.old() function has the following syntax:
=rand.old(p,l)

Note
In this function, p is the number of paragraphs, and l is the number of lines that you want to appear in each paragraph.
The parameters are optional. If you omit the parameters the default number of paragraphs is three, and the default number of lines per paragraph is also three.

Method 3: Use lorem()

To insert non-localized, pseudo-Latin sample text in Word 2007 or Word 2010, type =lorem() in the document where you want the text to appear, and then press ENTER.

The sample text that is inserted resembles the following text:
Lorem ipsum dolor sit amet, consectetuer adipiscing elit. Maecenas porttitor congue massa. Fusce posuere, magna sed pulvinar ultricies, purus lectus malesuada libero, sit amet commodo magna eros quis urna.

Nunc viverra imperdiet enim. Fusce est. Vivamus a tellus.

Pellentesque habitant morbi tristique senectus et netus et malesuada fames ac turpis egestas. Proin pharetra nonummy pede. Mauris et orci.
You can control how many paragraphs and lines appear by adding numbers inside the parentheses of the lorem() function. The =lorem() function has the following syntax: lorem(p,l)

Note
In this function, p is the number of paragraphs, and l is the number of lines that you want to appear in each paragraph.

The parameters are optional. If you omit the parameters the default number of paragraphs is three, and the default number of lines per paragraph is also three.

For more information about the description of the "Lorem ipsum dolor sit amet" text, click the following article number to view the article in the Microsoft Knowledge Base:
114222 Description of the "Lorem ipsum dolor sit amet" text that appears in Word Help
By default, the inserting sample text feature in Word 2007 or Word 2010 is turned on. However, the inserting sample text feature is disabled when the Replace text as you type option is turned off.

To turn the Replace text as you type option on or off, follow these steps:
  1. Click the Office Button, click Word Options, click Proofing, and then click AutoCorrect Options.
  2. Click to select or to clear the Replace text as you type check box.

How to insert sample text in Word 2003 and in earlier versions of Word:

To insert sample text in Word 2003, Word 2002, Word 2000, or in Word 97 for Windows, type =rand() in the document where you want the text to appear, and then press ENTER.

The sample text that is inserted resembles the following text:
The quick brown fox jumps over the lazy dog. The quick brown fox jumps over the lazy dog. The quick brown fox jumps over the lazy dog. The quick brown fox jumps over the lazy dog. The quick brown fox jumps over the lazy dog.

The quick brown fox jumps over the lazy dog. The quick brown fox jumps over the lazy dog. The quick brown fox jumps over the lazy dog. The quick brown fox jumps over the lazy dog. The quick brown fox jumps over the lazy dog.

The quick brown fox jumps over the lazy dog. The quick brown fox jumps over the lazy dog. The quick brown fox jumps over the lazy dog. The quick brown fox jumps over the lazy dog. The quick brown fox jumps over the lazy dog.
Note This text includes a paragraph symbol (¶) that is displayed when sample text is inserted.

You can control how many paragraphs and lines appear by adding numbers inside the parentheses of the rand() function. The =rand() function has the following syntax:
=rand(p,l)

Note In this function, p is the number of paragraphs, and l is the number of lines that you want to appear in each paragraph.
By default in these versions of Word, the sample text contains three paragraphs, and each paragraph contains five lines. When you omit the second number, the default is five lines of text. The maximum number that can be used inside the parenthesis is 200 (This number may be lower, depending on the number of paragraphs and of sentences that you specify).

By default, this feature is turned on. However, this feature is disabled when the Replace text as you type option is turned off. To turn this option on or off, follow these steps:
  1. Click AutoCorrect on the Tools menu, and then click the AutoCorrect tab.
  2. Click to select or to clear the Replace text as you type check box.
Note When the cursor immediately follows a PAGE BREAK or a COLUMN BREAK, Word will not insert sample text in these versions.

RAND function in Microsoft Word

Creating sample text in Word is easy if you know this somewhat obscure trick. And hold onto your hat: It still works in Word 2007!
Maybe you're experimenting with a particular Word feature or format and need to generate some dummy text to work with. Or maybe you need some placeholder text to use as you develop a page layout. Or maybe you're just bored to distraction. Whatever the case, the RAND function might be just what you need. Here's how to get this oddball function to work.
Click where you want to enter the sample text and type =RAND(). Put two numbers in the parentheses, separated by a comma. The numbers will tell Word to create a certain number of paragraphs (the first number) consisting of a certain number of sentences (the second number). So, for instance, the formula below will produce three paragraphs, each consisting of four sentences:
=RAND(3,4)
After you enter the formula, press Enter. Word will replace what you typed with the sample text, as shown in Figure A. rand function

Figure A

Word 2007 supports this feature as well, but for some reason, Microsoft decided to change the text generated by the function. As you can see in Figure B, the verbiage now appears to have been extracted from a help document. Some sort of subliminal user education scheme, perhaps. I'd be just as happy to stick with the lazy dog, but hey -- you can't fight progress. rand function 2007

Figure B

VMware Cloud Learning Video's

Here is a nice summary list of all VMworld US 2018 Breakout session with the respective video playback & download URLs. Enjoy! Bra...