Note To start the Graphical mode installation program, Enter the boot prompt:
Boot prompt
Welcome to Red Hat Enterprise Linux:
The Welcome screen does not prompt you for any input. From this screen you can access the Release Notes for Red Hat Enterprise Linux 5.0 by clicking on the Release Notes button.
Language Selection
Using your mouse, select a language to use for the installation (refer to Figure 4.8, “Language
Selection”).
The language you select here will become the default language for the operating system once it is installed. Selecting the appropriate language also helps target your time zone configuration later in the installation. The installation program tries to define the appropriate time zone based on what you specify on this screen.
Once you select the appropriate language, click Next to continue.
Keyboard Configuration
Using your mouse, select the correct layout type (for example, U.S. English) for the keyboard you would prefer to use for the installation and as the system default (refer to the figure below).
Once you have made your selection, click Next to continue.
 Note To change your keyboard layout type after you have completed the installation, use the Keyboard Configuration Tool. Type the system-config-keyboard command in a shell prompt to launch the Keyboard Configuration Tool. If you are not root, it prompts you for the root password to continue.
Enter the Installation Number
Enter your Installation Number (refer to Figure, “Installation Number”). This number will determine the package selection set that is available to the installer. If you choose to skip entering the installation number you will be presented with a basic selection of packages to install later on.
Disk Partitioning SetupPartitioning allows you to divide your hard drive into isolated sections, where each section behaves as its own hard drive. Partitioning is particularly useful if you run multiple operating systems. If you are not sure how you want your system to be partitioned, An Introduction to Disk Partitions for more information.
On this screen you can choose to create the default layout or choose to manual partition using the 'Create custom layout' option of Disk Druid.
The first three options allow you to perform an automated installation without having to partition your drive(s) yourself. If you do not feel comfortable with partitioning your system, it is recommended that you do not choose to create a custom layout and instead let the installation program partition for you.
You can configure an iSCSI target for installation, or disable a dmraid device from this screen by clicking on the 'Advanced storage configuration' button.
Warning
The Update Agent downloads updated packages to /var/cache/yum/ by default.If you partition the system manually, and create a separate /var/ partition, be sure to create the partition large enough (3.0 GB or more) to download package updates.
Create Default Layout
Create default layout allows you to have some control concerning what data is removed (if any) from your system. Your options are:
• Remove all partitions on selected drives and create default layout — select this option to remove all partitions on your hard drive(s) (this includes partitions created by other operating systems such as Windows VFAT or NTFS partitions).
• Remove Linux partitions on selected drives and create default layout — select this option to remove only Linux partitions (partitions created from a previous Linux installation). This does not remove other partitions you may have on your hard drive(s) (such as VFAT or FAT32 partitions).
• Use free space on selected drives and create default layout — select this option to retain your current data and partitions, assuming you have enough free space available on your hard drive(s).
Create default layout
Using your mouse, choose the storage drive(s) on which you want Red Hat Enterprise Linux to be installed. If you have two or more drives, you can choose which drive(s) should contain this installation. Unselected drives, and any data on them, are not touched
Note
If you have a RAID card, be aware that some BIOSes do not support booting from the RAID card. In cases such as these, the /boot/ partition must be created on a partition outside of the RAID array, such as on a separate hard drive. An internal hard drive is necessary to use for partition creation with problematic RAID cards.
A /boot/ partition is also necessary for software RAID setups.
If you have chosen to automatically partition your system, you should select Review and
manually edit your /boot/ partition.
To review and make any necessary changes to the partitions created by automatic partitioning, select the Review option. After selecting Review and clicking Next to move forward, the partitions created for you in Disk Druid appear. You can make modifications to these partitions if they do not meet your needs.
Click Next once you have made your selections to proceed.
Partitioning Your System
If you chose one of the three automatic partitioning options and did not select Review, skip ahead to “Network Configuration”.
If you chose one of the automatic partitioning options and selected Review, you can either accept the current partition settings (click Next), or modify the setup using Disk Druid, the manual partitioning
tool.
If you chose to create a custom layout, you must tell the installation program where to install Red Hat Enterprise Linux.
This is done by defining mount points for one or more disk partitions in which Red
Hat Enterprise Linux is installed.
You may also need to create and/or delete partitions at this time.
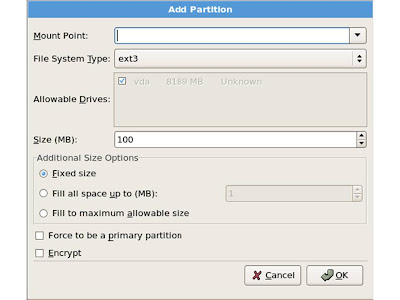
Adding Partitions
To add a new partition, select the New button. A dialog box appears
Note
You must dedicate at least one partition for this installation, and optionally more. For moreAn Introduction to Disk Partitions
Creating a New Partition
• Mount Point: Enter the partition's mount point. For example, if this partition should be the root partition, enter /; enter /boot for the /boot partition, and so on. You can also use the pull-down menu to choose the correct mount point for your partition. For a swap partition the mount point should not be set - setting the filesystem type to swap is sufficient.
• File System Type: Using the pull-down menu, select the appropriate file system type for this partition.
• Allowable Drives: This field contains a list of the hard disks installed on your system. If a hard disk's box is highlighted, then a desired partition can be created on that hard disk. If the box is not checked, then the partition will never be created on that hard disk. By using different checkbox settings, you can have Disk Druid place partitions where you need them, or let Disk Druid decide where partitions should go.
• Size (MB): Enter the size (in megabytes) of the partition. Note, this field starts with 100 MB; unless changed, only a 100 MB partition will be created.
• Additional Size Options: Choose whether to keep this partition at a fixed size, to allow it to "grow" (fill up the available hard drive space) to a certain point, or to allow it to grow to fill any remaining hard drive space available.
option. This allows you to keep a certain amount of space free on your hard drive for future use.
• Force to be a primary partition: Select whether the partition you are creating should be one of
the first four partitions on the hard drive. If unselected, the partition is created as a logical partition.
• Encrypt: Choose whether to encrypt the partition so that the data stored on it cannot be accessed
without a passphrase, even if the storage device is connected to another system. If you select
this option, the installer prompts you to provide a passphrase before it writes the partition to the disk.
• OK: Select OK once you are satisfied with the settings and wish to create the partition.
• Cancel: Select Cancel if you do not want to create the partition.
Editing Partitions
To edit a partition, select the Edit button or double-click on the existing partition.
To edit a partition, select the Edit button or double-click on the existing partition.
Note
If the partition already exists on your disk, you can only change the partition's mount point.
To make any other changes, you must delete the partition and recreate it.
Deleting a Partition
To delete a partition, highlight it in the deletion when prompted.
Boot Loader Configuration
To boot the system without boot media, you usually need to install a boot loader. A boot loader is the first software program that runs when a computer starts. It is responsible for loading and transferring control to the operating system kernel software. The kernel, in turn, initializes the rest of the operating system.
GRUB (GRand Unified Bootloader), which is installed by default, is a very powerful boot loader. GRUB can load a variety of free operating systems, as well as proprietary operating systems with chainloading (the mechanism for loading unsupported operating systems, such as DOS or Windows, by loading another boot loader).
Boot Loader Configuration
If you do not want to install GRUB as your boot loader skip this process, click If you already have a boot loader that can boot Red Hat Enterprise Linux and do not want to overwrite your current boot loader, choose Do not install a boot loader by clicking on the Change boot loader button.
Every bootable partition is listed, including partitions used by other operating systems. The partition holding the system's root file system has a
Other partitions may also have boot labels. To add or change the boot label for other partitions that have been detected by the installation program, click once on the partition to select it. Once selected, you can change the boot label by clicking the
Select move forward in the installation unless you choose a default boot image.
Label of Red Hat Enterprise Linux (for GRUB).Edit button.Default beside the preferred boot partition to choose your default bootable OS. You cannotChange boot loader, where you can choose not to install a boot loader at all.
Network Configuration
If you do not have a network device, this screen does not appear during your installation and you should advance to “Time Zone Configuration”.
Network ConfigurationThe installation program automatically detects any network devices you have and displays them in the Network Devices list. Time Zone Configuration
Set your time zone by selecting the city closest to your computer's physical location. Click on the map
to zoom in to a particular geographical region of the world.
From here there are two ways for you to select your time zone:
• Using your mouse, click on the interactive map to select a specific city (represented by a yellow dot).
A red X appears indicating your selection.
• You can also scroll through the list at the bottom of the screen to select your time zone. Using your
mouse, click on a location to highlight your selection.
Configuring the Time ZoneSet Root Password
Setting up a root account and password is one of the most important steps during your installation. Your root account is similar to the administrator account used on Windows NT machines. The root account is used to install packages, upgrade RPMs, and perform most system maintenance. Logging in as root gives you complete control over your system.
Note
The root user (also known as the superuser) has complete access to the entire system; for this reason, logging in as the root user is best done only to perform system maintenance or administration.
Root Password
The installation program prompts you to set a root password2 for your system. You cannot proceed to the next stage of the installation process without entering a root password.
The root password must be at least six characters long; the password you type is not echoed to the screen. You must enter the password twice; if the two passwords do not match, the installation program asks you to enter them again.
You should make the root password something you can remember, but not something that is easy for someone else to guess. Your name, your phone number, qwerty, password, root, 123456, and anteater are all examples of bad passwords. Good passwords mix numerals with upper and lower case letters and do not contain dictionary words: Aard387vark or 420BMttNT, for example. Remember that the password is case-sensitive. If you write down your password, keep it in a secure place.
However, it is recommended that you do not write down this or any password you create. NoteA root password is the administrative password for your Red Hat Enterprise Linux system. You should only log in as root when needed for system maintenance. The root account does not operate within the restrictions placed on normal user accounts, so changes made as root can have implications for your entire system. Do not use one of the example passwords offered in this manual. Using one of thesepasswords could be considered a security risk. Package Group Selection
Now that you have made most of the choices for your installation, you are ready to confirm the default package selection or customize packages for your system.
The Package Installation Defaults screen appears and details the default package set for your Red Hat Enterprise Linux installation. This screen varies depending on the version of Red Hat Enterprise Linux you are installing.
If you choose to accept the current package list, skip ahead to “Preparing to Install”.
To customize your package set further, select the Customize now option on the screen. Clicking Next takes you to the Package Group Selection screen.
You can select package groups, which group components together according to function (for example, X Window System and Editors), individual packages, or a combination of the two.To select a component, click on the checkbox beside it
Package Group Selection
Select each component you wish to install.
Once a package group has been selected, if optional components are available you can click on
Optional packages to view which packages are installed by default, and to add or remove optional packages from that group. If there are no optional components this button will be disabled.
Package Group DetailsPrepare to Install
A screen preparing you for the installation of Red Hat Enterprise Linux now appears.
For your reference, a complete log of your installation can be found in /root/install.log once
you reboot your system.
Installing Packages
At this point there is nothing left for you to do until all the packages have been installed. How quickly
this happens depends on the number of packages you have selected and your computer's speed.Installation Complete
Congratulations! Your Red Hat Enterprise Linux installation is now complete!
The installation program prompts you to prepare your system for reboot. Remember to remove any installation media if it is not ejected automatically upon reboot.
After your computer's normal power-up sequence has completed, the graphical boot loader prompt appears at which you can do any of the following things:
• Press Enter — causes the default boot entry to be booted.
• Select a boot label, followed by Enter — causes the boot loader to boot the operating system
corresponding to the boot label.
• Do nothing — after the boot loader's timeout period, (by default, five seconds) the boot loader automatically boots the default boot entry.
Do whatever is appropriate to boot Red Hat Enterprise Linux. One or more screens of messages should scroll by. Eventually, a login: prompt or a GUI login screen (if you installed the X Window System and chose to start X automatically) appears.
The first time you start your Red Hat Enterprise Linux system in run level 5 (the graphical run level), the Setup Agent is presented, which guides you through the Red Hat Enterprise Linux configuration.
Using this tool, you can set your system time and date, install software, register your machine with Red Hat Network, and more. The Setup Agent lets you configure your environment at the beginning, so that you can get started using your Red Hat Enterprise Linux system quickly.