With the advent of the technical world comes new operating systems each with some more facilities than its predecessor. The same happened with Windows. Recent operating systems like Windows 7 and also Windows Vista has a great dexterity in them that the Hard Disk can be partitioned, re-sized without formatting your computer. Here we discuss how to perform this act in Windows 7.
See also: Re-install Windows by Formatting Computer Without Losing Data
Shrinking or expanding the Hard Drive in Windows 7 can be brought about by a utility program known as Disk Management. How will you delete, re-size, or even create a new partition in this operating system is hereby described below:
Guidelines and procedure for the entire operation to be carried out successfully
1. First of all go to “ Start ” and then on the window that appears search for ” Computer ” and then once you right click on it another window opens and then you should navigate to the option “ Manage “.

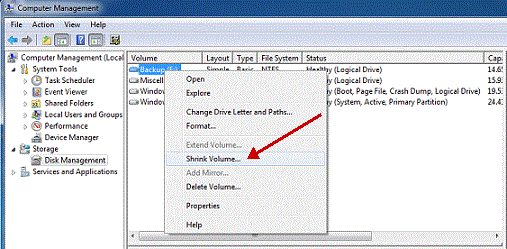
2. At once a new window will open entitled “Computer Management“. In this new window click on “ Storage ” and then go to “ Disk Management “.

3. The completion of the second step will give you a view of all the drives present in your computer.

4. Among these select the one you want to partition. Then right click on the selected drive and navigate to the option ” Shrink Volume.. “.
5. A new window should open in which the size of the drive before shrink will be mentioned and the available space to shrink will be mentioned , and in the next line you will be asked to enter the amount of space you want to shrink and this will be the size of the new partition.
Caution : The space you enter must be within the limit of the available space displayed above.
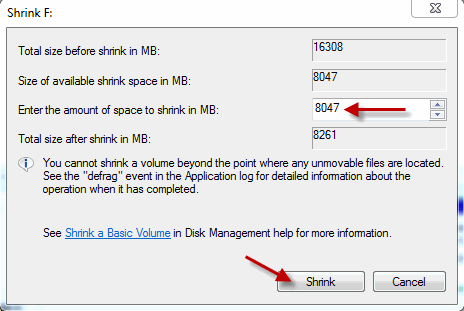
6. After entering the values click on the option “ Shrink ” and wait for the process to complete. The time taken for the operation may be long depending upon the size of the disk and the space to be shrunk. Once the operation is completed a window appears showing unallocated space and the value is exactly the one you entered earlier. Select this unallocated space and on right clicking on it click on the option “ New Simple Volume “.

7. A wizard will open up. Go through the wizard and fill in the values required. Usually the value needed to enter is the same one that you entered as the volume to be shrunk.
8. The drive newly created needs a letter to be assigned to it. Assign any letter of your choice as it does not make any difference.
9. A Format page will appear and in it carefully notice that the File System selected is “ NTFS ” . After this is done enter a name for your drive and then click on ” Next ” and then “ Finish “.

10. You have reached your goal. You have partitioned your Hard Drive in Windows 7 without formatting your computer and without the use of any software. Feel free to drop your comments in the comment box.
* Update: This article was written on the basis of a test in Windows 7 Ultimate version. But after getting the readers feedback, it seems that the procedure does not work fine in the other versions of Windows 7 like Home Premium etc. So please make sure that you are using Windows 7 ultimate before applying this method to partition the hard drive.
** Update: While the procedure works fine in Windows 7 Ultimate version, it does not work in Windows 7 home, starter or other versions properly if the number of partitions exceeds 4. That means if you try to create a new partition that is no 5 in your hard disk, this process will not work otherwise it will work fine. So if you are in Windows 7 Home or starter edition, make sure that your total no of partition is three before you go for a new partition.

Very nice post, I like your blogging techniques and have bookmarked this blog as found it very informative. Keep it up. Formatting Hard Drive
ReplyDelete